| Exercise 2.2 | Basic Data Inspection |
| Data | 3-1-1 case location details (XLS hosted on FTP) |
| Overall Goal | Inspect data |
| Demonstrates | Inspect data, including workspace output, feature caches, and filtering |
| Start Workspace | None |
| End Workspace | None |
Video covering use of the FME Data Inspector. This video will be updated to match this exercise for the FME 2019.0 release.
Let’s see how the FME Data Inspector interface works by inspecting the results of the last exercise.
1) Start FME Data Inspector
Start the FME Data Inspector by selecting it from the Windows start menu. You’ll find it under Start > FME Desktop 2018.1 > FME Data Inspector 2018.1.
2) Open Dataset in FME Data Inspector
The FME Data Inspector will start up and begin with an empty view display.
To open a dataset, select File > Open Dataset or Ctrl + O from the menubar. When prompted, fill in the fields in the Select Dataset dialog as follows:
| Reader Format | CSV (Comma Separated Value) |
| Reader Dataset | C:\FMEData2018\Output\Training\CA18COV1 - Service Request Loca.csv |
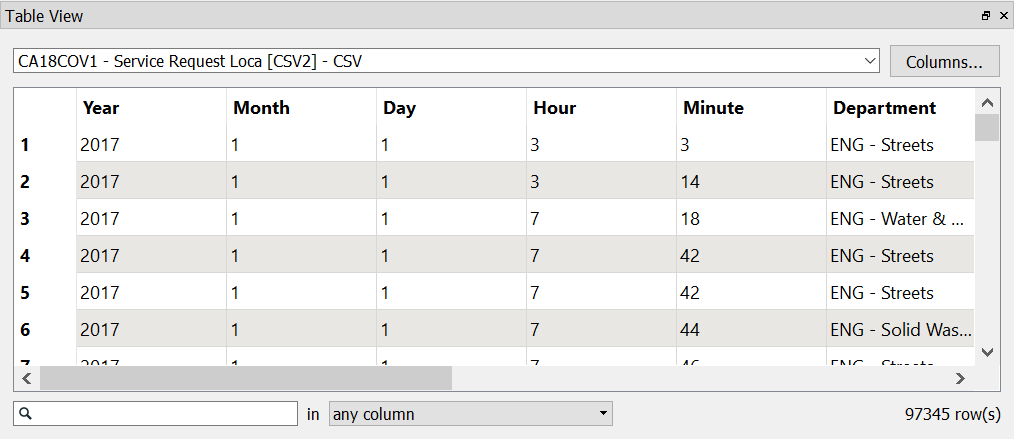
Click OK, and you will see a table appear in the Table View window:
The main View will be blank and will say "There is no geometry in this View." The View displays this message because we have loaded data with no geometry. As you will see later, if we load spatial data like a map layer, CAD drawing, or 3D model, it will be displayed here.
If you scroll through the Table View, you can see the different values of the 3-1-1 request attributes. Do you see any problems?
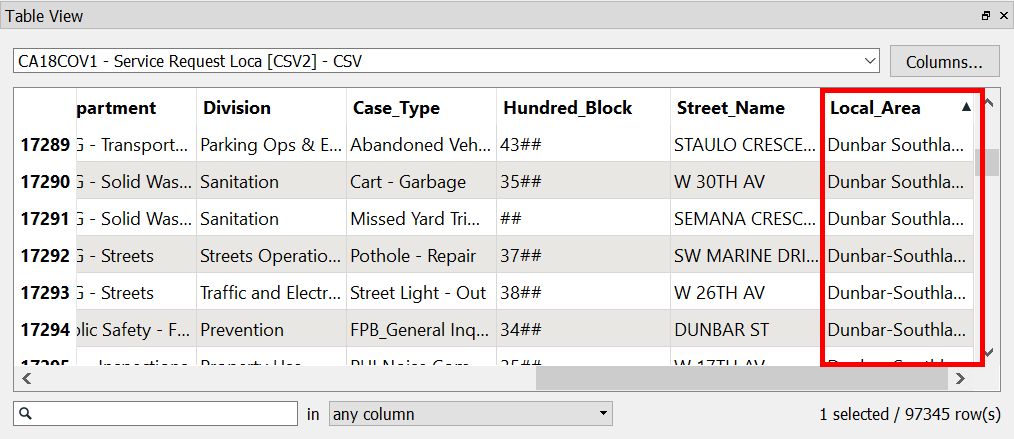
If you have a keen eye for data problems, you might spot inconsistent naming for the values in the Local Area attribute. Two of the area names have some values with a hyphen in some of the values, but not all: Dunbar Southlands and Dunbar-Southlands and Arbutus Ridge and Arbutus-Ridge:
Good thing we spotted this. We will clean up this inconsistency in a later exercise.
| TIP |
| This kind of visual inspection of data is a good first step, but more thorough data validation is usually required. As this is an introduction, we won't go into details regarding validation; you will just have to trust us that this problem exists! As you become more familiar with FME you can automate data validation. |
3) Add Dataset in FME Data Inspector
Using Open Dataset always displays the data in a new view in Data Inspector, shown in a tabbed interface above the View window:

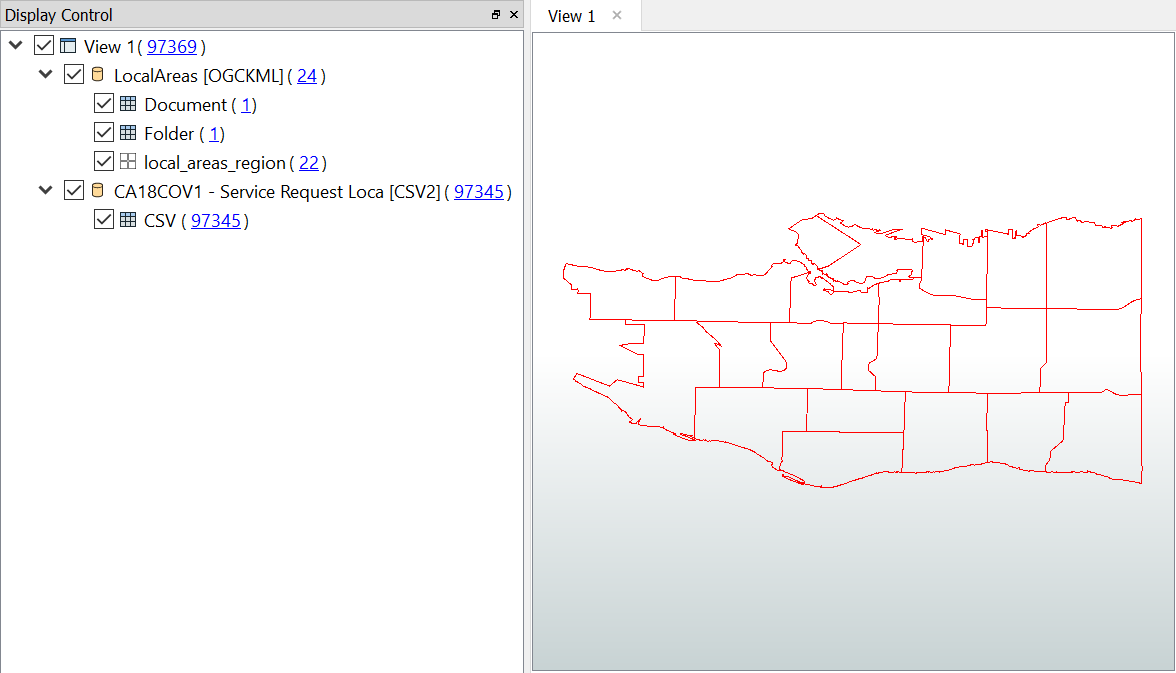
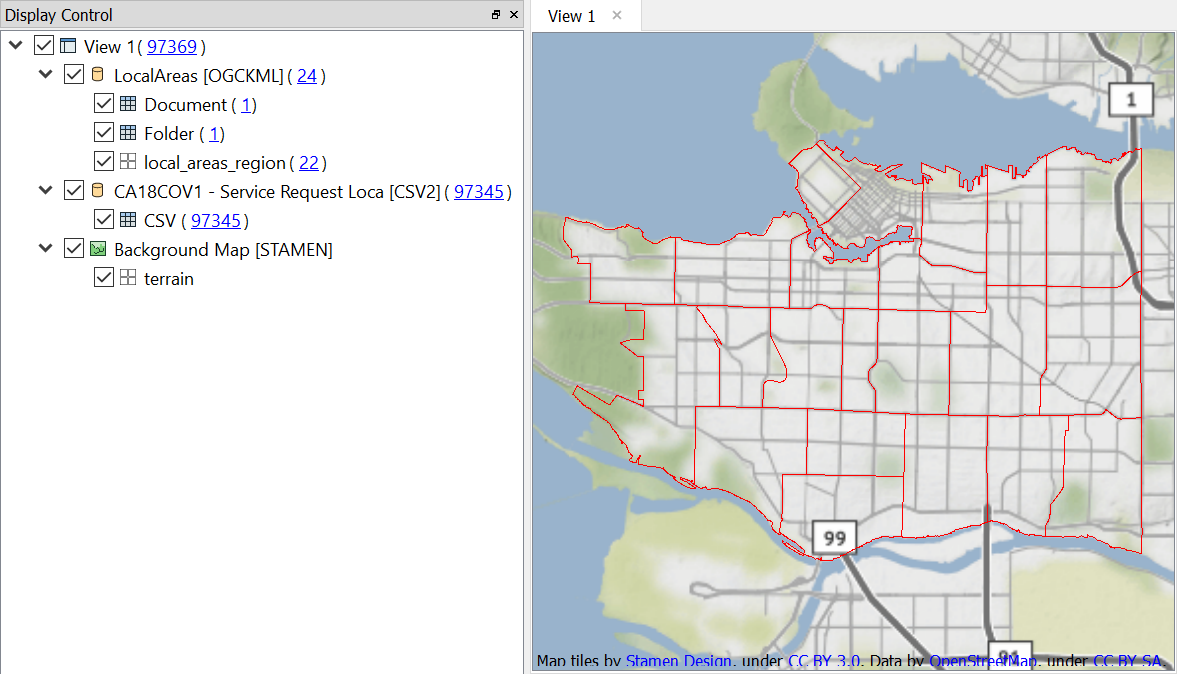
You can also add another dataset to the open view. Let's try out this feature by adding a dataset we'll be using in a later unit: local planning areas. This dataset is a KML file of polygons showing the outlines of Vancouver's local planning areas, which are designated by the city for purposes of planning and development. To add a dataset to an open view, select File > Add Dataset (or Ctrl + D). When prompted, fill in the fields in the Select Dataset to Add dialog as follows:
| Reader Format | Google KML |
| Reader Dataset | C:\FMEData2018\Data\Boundaries\LocalAreas.kml |
Click OK, and you will see a new feature type appear in the Display Control window. Additionally, you will see the local area polygons appear in the View window:
4) Add a Background Map
The local areas currently appear without any context. Let's improve the display by adding a background map. Select Tools > FME Options > Background Map (or on Mac, FME Data Inspector > Preferences > Background Map). Click the drop-down next to Background Format:
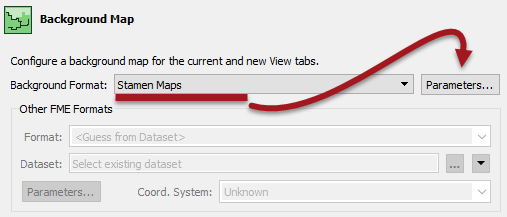
You will notice that FME supports a variety of background map services. Most require an existing account or server, but for this example let's select Stamen Maps, which we can use without an account.
After selecting Stamen Maps, click Parameters. Click the ellipsis button to retrieve the list of background map styles available. Select terrain and click OK:

Click OK twice to close the FME Options windows. You should see the background map appear shortly:
You can use the pan and zoom tools in the Toolbar to practice moving the view around the map:

5) Use Feature Caching
Let's look at one other way to open data in the Data Inspector: feature caching. This method is used more often than the one we just covered, as it is more tightly connected to actions taken in FME Workbench.
Use Workbench to open the results of your last exercise, if it is not already open. Feature caching is turned off by default; you can see the magnifying glass and small play button icon in the top left of your toolbar:

Click the button to turn feature caching on, or go to Run > Run with Feature Caching. Then rerun your workspace. You should notice a little green square with a magnifying glass filling up on your reader feature type:
![]()
This icon represents a feature cache. The cache stores features at that point of the translation, and you can click it to inspect the data. This mode is useful for two reasons:
- It allows you to examine the data at any point in the translation to check that your modifications are appearing as expected. Here it only appears on the reader, but if you had any other objects on the canvas, those would be cached as well.
- It cuts down on production time by allowing you to use data from caches to test portions of a workspace, rather than having to run the entire workspace each time. We call this Partial Runs. This feature is particularly important when you are working with large datasets, web-based data, or databases, which can take a long time to read. We'll use this feature in a later exercise.
Click the green icon to inspect the data at that point of the translation; your original Excel data will open in Data Inspector.
6) Filter Data to Check for Missing Values
Let's use the Data Inspector's Filter tool to see if we have missing values in our data. In the Data Inspector view with your XLSX reader feature cache open, click the Filter icon in the Data Inspector toolbar:

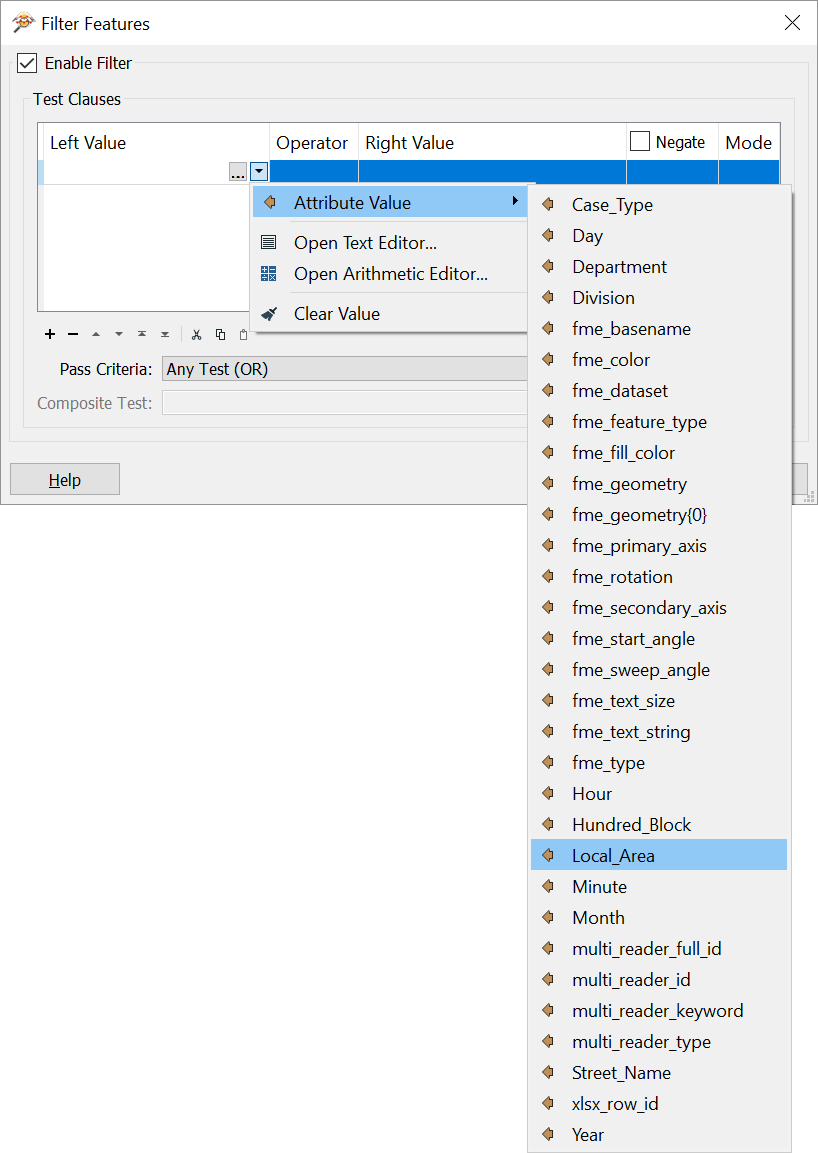
This button opens a window that lets us query our data to filter it. We have to fill in a Left Value, an Operator, and a Right Value, to form a logical operation. Check the box next to "Enable Filter." Then click in the Left Value cell. Click the drop-down arrow and select Local_Area:
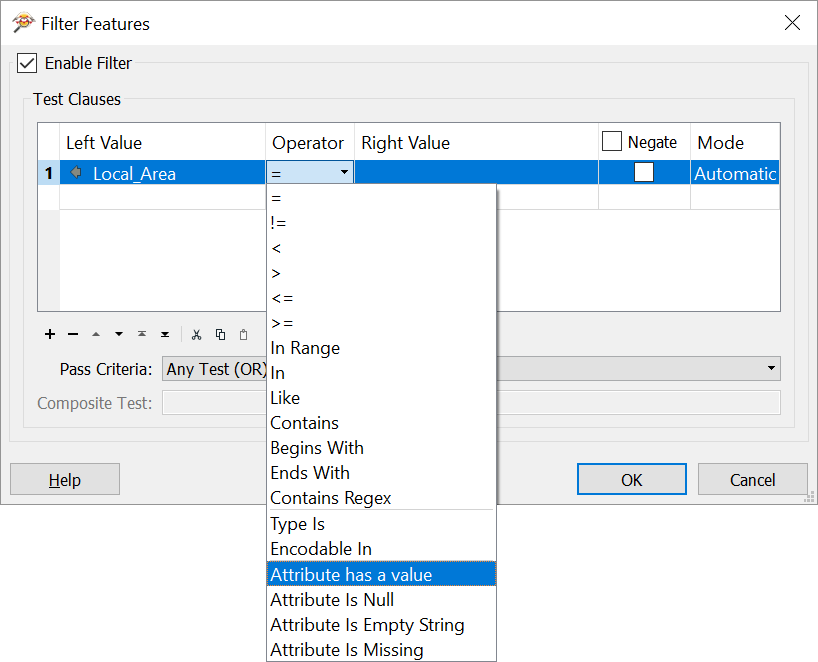
Then click the = in the Operator cell and choose Attribute has a value. You can see we have many ways of querying our data here. This option will select all of the features that have values. If there are features left over, we will know there are missing or null values in our data:
Your dialog should look like this:
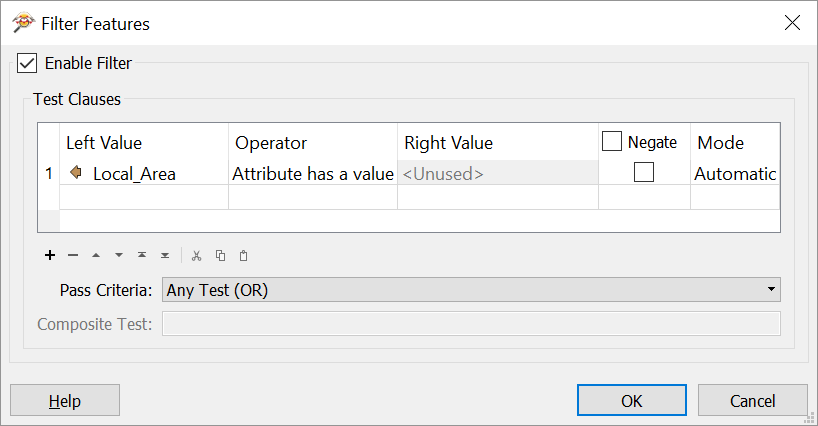
Click OK. Now look in the Display Control window. You might have to drag the right side to expand it. Look at "CaseLocationsDetails_2017_XLS [XLSXR]." To the right of this feature type name is a summary of the Filter results: "(93223 pass | 4122 fail)":
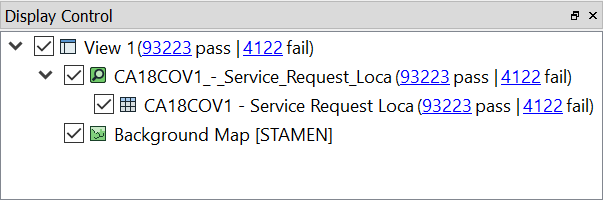
These feature counts are links; if you click them, the Data Inspector will select those features (rows in the table). Click the "4122." The Table View will show the first selected record. If you look through, it turns out we have two kinds of missing data:
- Some records do not have street addresses, leading them to not be associated with a local area.
- There are also two rows of missing data in between each month of records. You can verify this by scrolling down to find the gaps between each month (where the
Monthattribute changes from1to2,2to3, etc.).
We will remove these missing values using transformers in the next unit.
| CONGRATULATIONS |
By completing this exercise, you have learned how to:
|